An approval process is process that is used to approve records going into Salesforce or being modified within Salesforce. Approval processes are commonly used in companies that are publicly traded or highly regulated. Having a knowledge of how setup Approval Processes in Salesforce and how to modify them is incredibly valuable if you plan to work in finance, or government.
Approval processes definitely vary by industry as they will have different use cases but a common usecase would be approving discounts that are over certain percentages or the sale of certain products that may be restricted. In industries related to finance, or insurance there’s usually approval processes for products related to selling risky mortgages or selling risky insurance policies.
What are Approval Processes?
As mentioned, they control whether a record can be created or modified within Salesforce. Approval processes are very formal but have the potential to ensure that there’s strong checks and balances on data and the decisions being made based on data. Approval Process are basically responsible for enforcing compliance; they contain a series of steps that can be taken manually or automatically and who can approve each step.
For the most part, workflows and approval processes can do a lot of the same actions. For example, workflows and approvals can both:
- Create a Task
- Send an email
- Update a field on the object.
- Send outbound messages which can be used for integrations.
The process also handles what happens when a record is approved, rejected or first submitted. Approval processes are submitted when a user clicks a Submit for Approval button or can be done through apex or process builders. A future post will provide a way to call an approval process though apex because we all know manual actions can get missed. 🙂
Approval processes are composed of the following:
- Criteria for Record Entry
- Routing who can approve the record and who can approve the record.
- Who to notify, and how to notify them
- Steps to Approve the Record or to Reject the Record.
Approval processes can send an email and post to Chatter when a record qualifies to be reviewed. When the approval request has been sent the approver goes to a special page to approve the request which can be customized to include additional information.
Considerations before Use
Approval Processes have quite a few different limitations that you need to consider before you should start to use them in your Salesforce Org.
- There’s a limit of the number of emails that can be sent. The limit is pretty high, believe it’s 1,000 per standard license, so I’m sure it wouldn’t be an issue for most orgs.
- There’s a 30 step limit to an approval process. For really complex processes this could be possible to hit, for most of what I’ve seen it shouldn’t be too much of a problem though.
- Flows can delete records that are currently in the approval process.
- Record locking can result in you, the Salesforce Admin, taking on a considerable amount of extra work if approvers take a considerable amount of time.
- Approval Actions don’t fire workflow rules.
- Approval processes can’t be easily modified even if the process is made inactive.
How to Setup an Approval Process
Setting up an Approval Process can be really simple or incredibly complex depending on the number of steps and what needs to be done. I usually try to initially create it in the setup wizard.
To provide an example usecase that doesn’t require a lot of explanation we’re going to Require Approval for All Sales to Indonesia that are >= $500. We’re doing this because apparently Indonesia has a high fraud rate. I don’t really know if that’s the case, but a couple of sites on Google suggested it’s a country with a fraud problem.
Before beginning keep in mind that we need an email template that can provide enough information to the approver that they could response to the email with Approved and not necessarily need to look at the record in Salesforce. Usually, this means you’re going to want to include quite a bit of detail.
Approval processes can be setup by doing the following steps:
- Click Setup
- Click Create
- Go to Workflow & Approvals and choose Approval Processes. If your Salesforce org doesn’t have any currently setup a warning will be displayed about how complex they are.
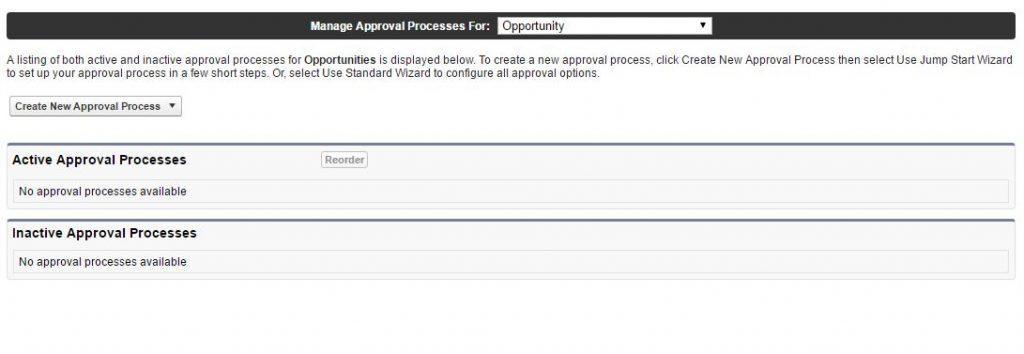
- In the dropdown, there should be a list of all of the available objects in the Salesforce Org. Nearly every single object in the org should be available to run approval processes on. If you select an object like the Opportunity the page should do a postback and have buttons to create a New Approval Process.
- When you click the Create new Approval Process button there should be two options displayed. The Jump Start Wizard basically does very simple processes that don’t have a lot of steps. I don’t think I have ever really been able to use it. Click on the Standard Wizard Option.
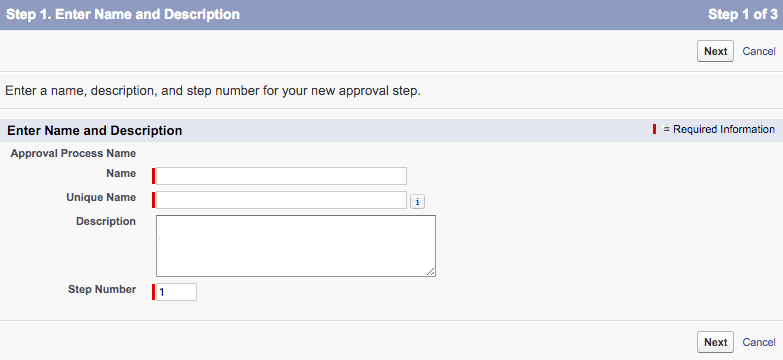
- The Standard Wizard provides six basically complex steps that need to be carried out to create an approval process. Provide a name, unique name, and a description. The Unique Name can be used by apex, so try to keep it meaningful. Press Next.
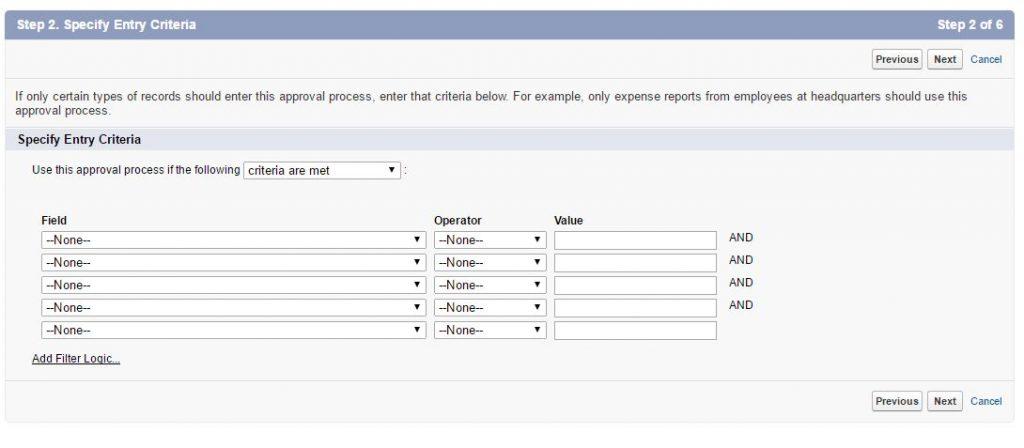
- The Specify Criteria screen controls whether a record has to go through the approval process or not. This works exactly like the workflow and formula screens do. For my particular example I’m going to simply set the Opportunity: Amount greater or equal 500 and Account: Billing Country equals Indonesia. Then press next.
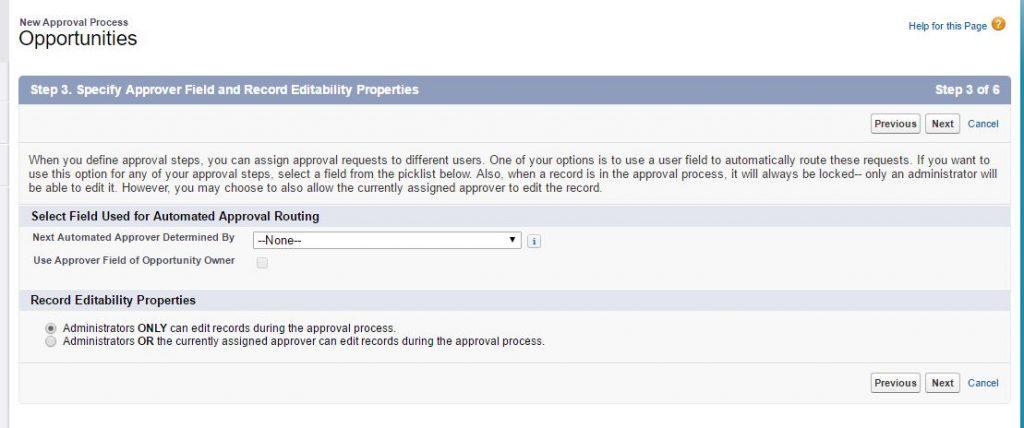
- Next we need to be able to decide who will approve the record and who can modify the record while it’s in the approval process. Who you would choose really depends on your company, in some companies it might be a direct supervisor or it might be only one or two people that act as gatekeepers.
- Next we need to set the Approver Settings. The Delegated Approver is usually somebody that covers for the approver when they are sick, on vacation, etc so that records don’t get stuck in the queue.
- Select an email template to send to the approver.
- Approval Page Layout. Basically add all of the fields you think the approver would need. Usually, it’s going to be things like Opportunity Name, Account Name, Amount, Owner, Industry, etc.
- Specify Initial Submitters. In this step, we’re choose who can submit the record to the approval process. The Record owner is usually the right choice because they already have the permissions, have the context around the record, etc. In some cases, it might make sense for specific users or roles to submit records. Usually, you want to add the Approval History on Page Layouts so that users can see when things were submitted, where it is in the process, and the status or comments.
- Now we’re presented with a step where we can decide if we want to create it now or take a break. Usually, I immediately choose the first option and press the Go button.
- Now we’re able to finally create the steps in the process. Usually, you want to provide a really good name and description so when doing maintenance later on you can easily grasp what you were thinking.
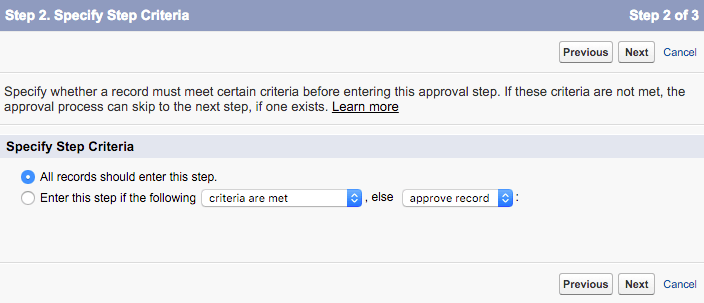
- Now we can specify the critera for whether a record should go through this step or not. If you want all records to always go into this step, then you should choose the first option otherwise choose the second option.
- Next we choose who should approve the step. Usually you want the same person / group of people. I recommend clicking the delete approver checkbox if possible. Press Save.
- We’ve now completed our first Step. If you would like you can continue iterating through and adding steps.



When records are rejected they can go back to previous steps or result in a final rejection. When an approver rejects a record, we can have certain steps happen like in workflows.
Reporting
Reporting for approval processes is not very good. In fact, I don’t think there’s a way to report on approval status or age without adding custom fields. A really good practice for reporting on age is to set a Field Update in the “Initial Submission Action” that sets an Approval Submitted Date/Time field. You want to set the Date/Time to NOW(). In the Final Actions set a different field called Approval Status Approved to the current Date (NOW()).
You can then report on the age by subtracting the dates or by using a formula.
Keep in mind that even though there’s quite a few limitations there are times when an approval process can make sense. For example, the Record Locking process is probably one of the biggest downfalls of the approval process, but at the same time it’s also incredibly important that it not be changed until it’s been approved. Douglas Cayers provides a potential solution for dealing with recording locking that’s really well done.
If you found this post useful please share it by using the sharing buttons.
