
Node is an open source server platform that runs on top of Google Chrome’s JavaScript engine called V8. Node includes basically everything needed to execute a program written in JavaScript. Ryan Dahl developed it in 2009. My blog post Why JavaScript is a pretty good overview of why I like and use JavaScript for many things.
Excel is a really commonly used spreadsheet program that lots of companies use to transmit data. While working at multiple market research companies, I’ve used it lots of times for final client deliverables. Excel has gotten very powerful over the last ten years and now includes a lot of machine learning like functionality.
Over the years, I’ve probably used dozens of Excel file creators and parsers. In pretty much every application or web service there becomes a need to output a file to Excel or csv. Finding a really good library that doesn’t require Excel to exist on the server can be really hard.
ExcelJS is a pretty good package for reading and manipulating Excel files. Prior to using ExcelJS I had spent a lot of time trying to get excel4node to work and it just never really things that I needed or wanted.
ExcelJS provides a pretty simple interface to generate pretty advanced Excel documents that can include things like formatting, borders, formulas, pivot tables and even some graphs. The big thing I like about ExcelJS is that I can update existing files and use them like a template, and it actually works with pivot tables. A lot of the open source Excel writers don’t work with pivot tables.
Let’s pretend we were working for the accounting department and needed to work on a way to report on the number of people that owe money. We cobble together some sort of query and get our data to look something like this:
[{
  firstName: 'John',
  lastName: 'Bailey',
  purchasePrice: 1000,
  paymentsMade: 100
}, {
  firstName: 'Leonard',
  lastName: 'Clark',
  purchasePrice: 1000,
  paymentsMade: 150
}, {
  firstName: 'Phil',
  lastName: 'Knox',
  purchasePrice: 1000,
  paymentsMade: 200
}, {
  firstName: 'Sonia',
  lastName: 'Glover',
  purchasePrice: 1000,
  paymentsMade: 250
}, {
  firstName: 'Adam',
  lastName: 'Mackay',
  purchasePrice: 1000,
  paymentsMade: 350
}, {
  firstName: 'Lisa',
  lastName: 'Ogden',
  purchasePrice: 1000,
  paymentsMade: 400
}, {
  firstName: 'Elizabeth',
  lastName: 'Murray',
  purchasePrice: 1000,
  paymentsMade: 500
}, {
  firstName: 'Caroline',
  lastName: 'Jackson',
  purchasePrice: 1000,
  paymentsMade: 350
}, {
  firstName: 'Kylie',
  lastName: 'James',
  purchasePrice: 1000,
  paymentsMade: 900
}, {
  firstName: 'Harry',
  lastName: 'Peake',
  purchasePrice: 1000,
  paymentsMade: 1000
}]
Ok, it’s pretty simple sample data but it’s good enough to provide how easy it is to create a simple Excel based report. Let’s begin by getting the packages we need.
Getting Started – Installation
From the root of your project you can simply open a new terminal window and run “npm install exceljs”. After the installation is complete, we should see that our package.json file is updated. (If you don’t have a package.json file you can create one by running “npm init”)
It should include changes like:
"dependencies": {
    "exceljs": "^3.9.0"
  }
In index.js or whatever file you’re using, it’s pretty easy to declare and begin using the file. You’ll need to include it at the top of the file like so
'use strict'

const Excel = require('exceljs')
A workbook is an Excel file that contains many worksheets. You need to declare a new Workbook so that you have something to work in.
// need to create a workbook object. Almost everything in ExcelJS is based off of the workbook object.
let workbook = new Excel.Workbook()
Note: I like to use Standard Style, so I don’t generally use semicolons and I let Prettier worry about silly things like tabs vs spaces. 🙂
Everything in Excel works off of the concept of a worksheet. A worksheet is a single page in the file. A really simple way of thinking of them is to think about the tabs at the bottom.
let worksheet = workbook.addWorksheet('Debtors')A second parameter can be optionally provided when creating the worksheet that can specify things like the tab colour to use, whether to show gridlines or other things.
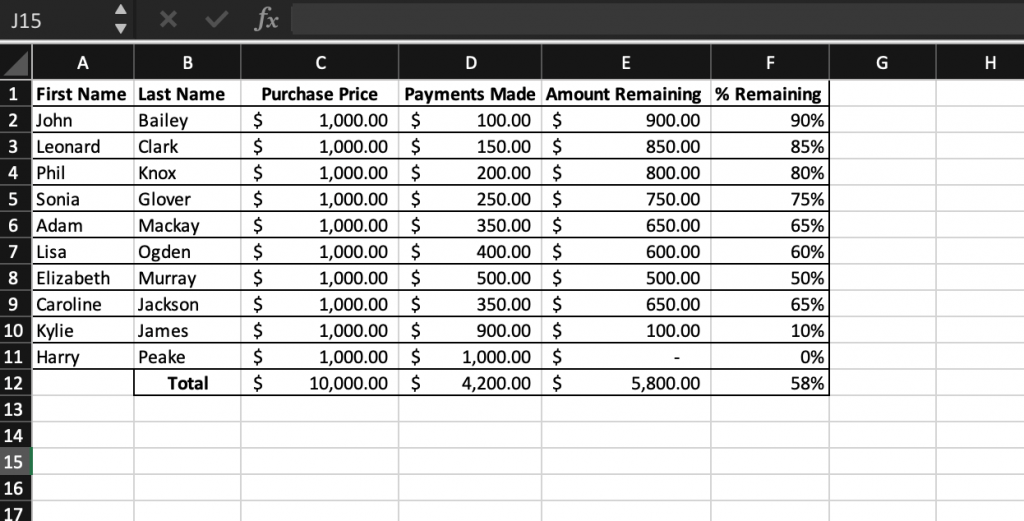
Let’s say we wanted to create an Excel file that looked like the following, the code to do this isn’t really all that complex.
Excel works off of concepts called rows and cells. A row would be 1,2, 3,4, 5, etc. Anything horizontal is a row.
Looking vertically (or up and down) is a column. For example, “B” is a row.
A cell is a particular spot, it’s address is made up of a column and then a row number. For example “A1” is the first cell in a spreadsheet.
Worksheet Columns
ExcelJS has created a pretty helpful concept called columns off of the worksheet object. By using it we can easily dump an array into Excel without really having to do much manipulation.
worksheet.columns = [
  {header: 'First Name', key: 'firstName'},
  {header: 'Last Name', key: 'lastName'},
  {header: 'Purchase Price', key: 'purchasePrice'},
  {header: 'Payments Made', key: 'paymentsMade'},
  {header: 'Amount Remaining', key: 'amountRemaining'},
  {header: '% Remaining', key: 'percentRemaining'}
]
Formatting the Header
The header in our example doesn’t really have too much formatting other than being bold and about as wide as the titles. Doing this is with a loop and taking advantage of the row functionality is pretty easy.
// force the columns to be at least as long as their header row.
// Have to take this approach because ExcelJS doesn't have an autofit property.
worksheet.columns.forEach(column => {
  column.width = column.header.length < 12 ? 12 : column.header.length
})

// Make the header bold.
// Note: in Excel the rows are 1 based, meaning the first row is 1 instead of 0.
worksheet.getRow(1).font = {bold: true}
Inserting The Data Into Excel
To do this, I’m doing a for each on the data array and immediately putting the values into Excel.
One thing I can’t emphasize enough is that in Excel everything is 1 based, meaning that you must start with 1 instead of 0 when looping through arrays.
I’ve seen a lot of Excel newbies that spend a lot of time trying to debug why their sheet isn’t working because they forgot Excel is 1 based instead of 0 based.
You can see that I’m using destructuring (“…”) to put all of the existing values in and then I’m adding some custom formulas for each row.
// Dump all the data into Excel
data.forEach((e, index) => {
  // row 1 is the header.
  const rowIndex = index + 2

  // By using destructuring we can easily dump all of the data into the row without doing much
  // We can add formulas pretty easily by providing the formula property.
  worksheet.addRow({
    ...e,
    amountRemaining: {
      formula: `=C${rowIndex}-D${rowIndex}`
    },
    percentRemaining: {
      formula: `=E${rowIndex}/C${rowIndex}`
    }
  })
})
Formatting Data
Formatting data is one of the most important parts of setting up an Excel sheet so that your users can easily grasp what they’re looking at and make wise decisions off of it. Formatting data means we’re adding the $, a percentage sign or maybe we’re switching it accounting style which
Data can be formatted at the column, row or cell levels. I generally try to keep formatting at the column level which means I try to keep the same data type in every column.
Columns need to use a number, which is also 1 based. To do this we basically convert the letter to a a number by its index in the English alphabet. So column A is 1, column B is 2, and so on.
// Set the way columns C - F are formatted
const figureColumns = [3, 4, 5, 6]
figureColumns.forEach((i) => {
  worksheet.getColumn(i).numFmt = '$0.00'
  worksheet.getColumn(i).alignment = {horizontal: 'center'}
})

// Column F needs to be formatted as a percentage.
worksheet.getColumn(6).numFmt = '0.00%'
Formatting Borders
Formatting cells in Excel with borders is a great way of drawing attention to things. Lots of companies have been using this for a long time, ie: newspapers, magazines, and web pages.
I like to start every project with outlining the rows, and table outline. ExcelJS has a number of border properties that it supports. The styles it supports are as follows:
- thin
- dotted
- dashDot
- hair
- dashDotDot
- slantDashDot
- mediumDashed
- mediumDashDotDot
- mediumDashDot
- medium
- double
- thick
I generally only use “thin” or “none”. Thin is the standard border that you normally see in Excel.
In the example, we set the top, bottom, left, and right border styles for each cell individually. I haven’t found a way to do this with a range and haven’t had a big enough file to need to do this more efficiently.
// loop through all of the rows and set the outline style.
worksheet.eachRow({ includeEmpty: false }, function (row, rowNumber) {
  worksheet.getCell(`A${rowNumber}`).border = {
    top: {style: 'thin'},
    left: {style: 'thin'},
    bottom: {style: 'thin'},
    right: {style: 'none'}
  }

  const insideColumns = ['B', 'C', 'D', 'E']
  insideColumns.forEach((v) => {
    worksheet.getCell(`${v}${rowNumber}`).border = {
      top: {style: 'thin'},
      bottom: {style: 'thin'},
      left: {style: 'none'},
      right: {style: 'none'}
    }
  })

  worksheet.getCell(`F${rowNumber}`).border = {
    top: {style: 'thin'},
    left: {style: 'none'},
    bottom: {style: 'thin'},
    right: {style: 'thin'}
  }
})
Saving the Excel File
Saving the Excel file is pretty easy , it just requires specifying a file name and a file path if needed.
// Keep in mind that reading and writing is promise based.
workbook.xlsx.writeFile('Debtors.xlsx')
Wrapping Things Up
I’ve created a git repo with all of the code for creating an Excel File with NodeJS and quite a few comments. You can see the repo on github: https://github.com/brcline/getting-started-with-exceljs
ExcelJS has some really great documentation and a really active community of supporters. For the most part, the API is very similar to the way things were done in VB6 / VBA so you should be able to steal ideas and examples from the past and be able to do some pretty sophisticated things.


